Sunday 6 January 2008

Product photography


1/125 sec at f/8, ISO 100.
Nikon D200 with 18-200VR at 46mm.
Lit by a strobe with softbox on stand.
Taken 5 January 2008 in Oslo, Norway.

Anna is selling an old wrist watch on the Swedish eBay affiliate and wanted a picture of it for the auction; so after a few futile attempts with on-camera flash, I brought out the big guns; the studio lighting kit my colleagues from Amsterdam got me as a leaving gift last year. After a slight mental breakdown I finally realized a flash sync speed of 1/250s and a shutter speed of 1/500s isn't going to work out, and then this was the first shot that came out of it. Cropped in ACR, colour corrected using curves in Photoshop and that's it.

Snow fall

It's basically been snowing for three days solid now, so we're finally getting some winter spirit, and about time too. A few shots taken through the kitchen and living room windows; taken through lightroom, converted to black and white, slightly processed (auto tone, some exposure, some blacks) + one little spot removal on one of the shots, then taken into Photoshop for resize and sharpening. No other retouching done.


Wednesday 28 November 2007

On the edge

1/60 sec at f/11, ISO 100.
Nikon D200 with 18-200VR at 40mm.
Taken 23 October in Fuengirola, Andalucia, Spain.

Anna, getting her shoes all wet in the Mediterranean, and Bettan; one half of the couple we visited in Spain. (Eventually, there will be shots from other places as well, I promise. Just having a hard time getting myself to import everything.)

Tuesday 27 November 2007

How I approach black-and-white conversions

I've had a couple of questions lately about my black-and-white images, and how I get them the way I do; so I had to think about it for a while and see if I could come up with a couple of steps I normally take. Naturally, it varies from image to image, but there are a few techniques that I return to.

Now, first of all, you need to look at your image and decide where you want to take it, and then see if you think your image stands up to the treatment you need to subject it to. Does it have a lot of contrast? A lot of detail? A lot of (potential) grayscales or is it more of a "lithographic" image? Is there a clear subject, or are there more parts of the image competing for the viewer's attention? Can you retouch the image to get rid of disturbing background elements? I find that the end results get better if I go through these types of questions before I start messing around (and that's a technical term) - naturally, you can get really good results by experimenting as well, but it never hurts to have an idea of where you're going before you put on your shoes (if anyone has any good metaphors to sell, please leave a comment).

My first step, thus, is deciding if the image is right for a mono conversion, and if it is; I try to get it as contrasty and crisp as I need it to be (in colour) within ACR or Lightroom before opening the image in Photoshop. Let me take you through the steps.

Straight out of the camera, there's not much to this photo:

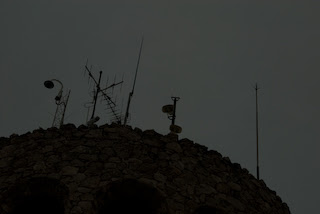
My lousy excuse for this is that someone (...) had set my camera to -2 EV the night before and didn't reset it afterwards... Now, the whole plan for this originally was a mono conversion, so I decided to keep it as it was and see what I could do about it in post. (Also, it was a bright day, so it was hard to see on the monitor how badly exposed it was.)

Lightroom time. I experimented with the sliders until I got a version I felt I could use; a madly custom white balance, upping the exposure by 1.75 (to get it back to nearly 0...), bumping fill light (to bring out the arches and contrast) and blacks as well as clarity and removing all the vibrance. I also cropped it a bit tighter to improve the composition.


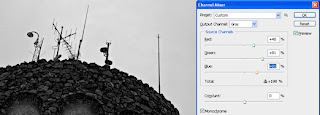
So now, it is Photoshop time. The first thing I tend to do in Photoshop is to do the conversion to black-and-white. Being a very recent CS3-convert, I haven't really used the Black-and-White adjustment layer much, so I'll stick with the tools I know for now. In this case, the Channel Mixer. (And remember, the Layer Police are not going to come looking for you in case all your channels don't add up to 100%. Be creative.)


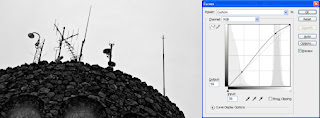
With the black-and-white version locked in, it's time for the contrast. Everybody say hi to our good old friend Curves. :-) Normally I'd go for more of an S-shaped curve, but this one demanded the blacks be opened up a bit.


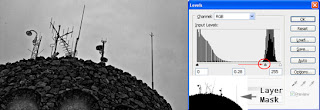
After this, I decided to darken the sky a bit. I did this using the Levels adjustment layer with a mask to affect only the sky. The mask looks complex, but it's easy enough to do. Go to your Channels panel, copy either of the channels (we're in mono mode, so they're all identical), then throw levels onto it to make it almost completely posterized in black and white. Any missing bits you just fill in with a brush. Ctrl/Cmd-click on the channel thumbnail to load it as a selection, go over to the layer mask thumbnail, invert your selection and fill with black. Tadaah!


Now, we're nearly there. All that remains is a bit of retouch (some nasty spots showed up after the levels adjustment) and some sharpening and we're pretty much done. Use your favourite retouching tools on a blank layer (remember to check Sample all layers), merge and sharpen using the luminosity sharpening technique. After a few 
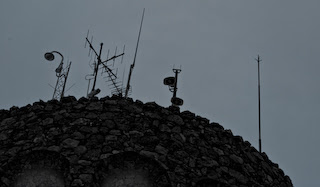
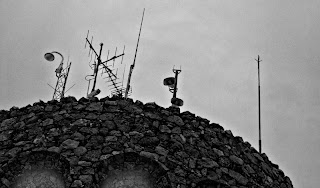
fairly simple steps - three adjustment layers - we have a black and white conversion:


Of course you can take this further if you want to - and I sometimes do - by adding grain or noise, blurring elements, dodging and burning, painting in bits that need to be solid black (aka "cheating", try it; it's great), adding other filters, et cetera. It's all up to you. That's the beauty of this business.

Hope this inspires you; feel free to post links to your black-and-whites in the comments section, whether they are done using some of the tips picked up here or not. And don't forget; have fun!

Monday 26 November 2007

Moody blues

1/160 sec at f/8, -2 EV, ISO 100.
Nikon D200 with 18-200VR at 95mm.
Taken 24 October 2007 in Puerto Bañus, Marbella, Andalucia, Spain.

In the foreground, you see the lighthouse in Puerto Bañus in Marbella, Spain. The chunk of land on the far right is Gibraltar and the larger chunk in the background is, well, Africa. Morocco, to be precise.

Thursday 22 November 2007

The Lightroom double-exposure conundrum

I hinted in my initial Lightroom post that there was a situation where I still used ACR. It's when I need to do the double-exposure merge trick, simply because I don't know how to get this to work within Lightroom; perhaps one of my readers might be able to help out?

In the olden days, before Lightroom, you would open your raw file in ACR, create an exposure that made your ground look OK, but the sky washed out, hit Shift to have the "Open Image" button turn to "Open Object" to open the file as a Smart Object within Photoshop. Once there, you'd right-click the layer thumbnail and select "New Smart Object via copy", double-click the new layer thumbnail to open the new object in ACR, change the settings so that the sky looked OK, save and go back to Photoshop and mask out the ground from the top layer and, hey presto, you'll have a perfectly exposed sky to go with your perfectly exposed ground.

Now, with Lightroom this doesn't quite work. I expose the ground properly in Lightroom, export to Photoshop, select "New Smart Object via copy" and double-click the layer thumbnail... only to have a PSB file opened inside of Photoshop. No ACR action. For this to happen, I need to expose in Lightroom, write the image settings to an XMP sidecar (one keyboard shortcut) and then open the raw file from within Photoshop to force it to use ACR - where I then follow the above steps. It works but it's a bit backwards, it takes a few extra steps.

Anyone got any hints on how to improve this? Is there a way of getting this to work without having to take the extra steps? I imagine one way of at least making it ONE step shorter is to set ACR as the "Additional External Editor" in the Preferences dialogue to make sure it comes directly via ACR into Photoshop as a Smart Object, rather than having to convert it manually - but how do I do this? Ore are there any other suggestions?

Wednesday 21 November 2007

The woman I love - at least part of her*)

1/2000 sec at f/4.8, ISO 200.
Nikon D70 with 18-200VR at 46mm.
Taken 2 June in Platanias, Crete, Greece.

Anna was in what must be called her spiritual home, Greece, for a week off before kicking off her summer job this year. With about a minute of planning, I decided to go down and visit her for a day. Between spending six hours at Athens Airport waiting for the connecting flight to Chania and me getting up to find a taxi in Platanias at 04.30 two mornings later we had a great time, I don't regret doing it one bit.

This was the last trip I took before I got my new camera (I still have the D70 as my "second" camera) and this is one of the better shots I took that day. The view from the old town in Platanias is stunning, although you can't see much of it here. :-)

*) And what I mean by that is that you can only SEE part of her, not that I only LOVE part of her. :-)