Wednesday 28 November 2007

On the edge

1/60 sec at f/11, ISO 100.
Nikon D200 with 18-200VR at 40mm.
Taken 23 October in Fuengirola, Andalucia, Spain.

Anna, getting her shoes all wet in the Mediterranean, and Bettan; one half of the couple we visited in Spain. (Eventually, there will be shots from other places as well, I promise. Just having a hard time getting myself to import everything.)

Tuesday 27 November 2007

How I approach black-and-white conversions

I've had a couple of questions lately about my black-and-white images, and how I get them the way I do; so I had to think about it for a while and see if I could come up with a couple of steps I normally take. Naturally, it varies from image to image, but there are a few techniques that I return to.

Now, first of all, you need to look at your image and decide where you want to take it, and then see if you think your image stands up to the treatment you need to subject it to. Does it have a lot of contrast? A lot of detail? A lot of (potential) grayscales or is it more of a "lithographic" image? Is there a clear subject, or are there more parts of the image competing for the viewer's attention? Can you retouch the image to get rid of disturbing background elements? I find that the end results get better if I go through these types of questions before I start messing around (and that's a technical term) - naturally, you can get really good results by experimenting as well, but it never hurts to have an idea of where you're going before you put on your shoes (if anyone has any good metaphors to sell, please leave a comment).

My first step, thus, is deciding if the image is right for a mono conversion, and if it is; I try to get it as contrasty and crisp as I need it to be (in colour) within ACR or Lightroom before opening the image in Photoshop. Let me take you through the steps.

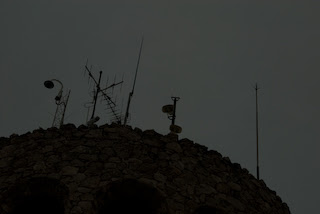
Straight out of the camera, there's not much to this photo:

My lousy excuse for this is that someone (...) had set my camera to -2 EV the night before and didn't reset it afterwards... Now, the whole plan for this originally was a mono conversion, so I decided to keep it as it was and see what I could do about it in post. (Also, it was a bright day, so it was hard to see on the monitor how badly exposed it was.)

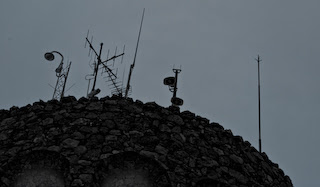
Lightroom time. I experimented with the sliders until I got a version I felt I could use; a madly custom white balance, upping the exposure by 1.75 (to get it back to nearly 0...), bumping fill light (to bring out the arches and contrast) and blacks as well as clarity and removing all the vibrance. I also cropped it a bit tighter to improve the composition.


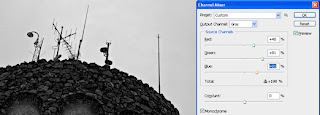
So now, it is Photoshop time. The first thing I tend to do in Photoshop is to do the conversion to black-and-white. Being a very recent CS3-convert, I haven't really used the Black-and-White adjustment layer much, so I'll stick with the tools I know for now. In this case, the Channel Mixer. (And remember, the Layer Police are not going to come looking for you in case all your channels don't add up to 100%. Be creative.)


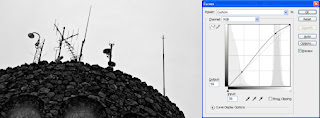
With the black-and-white version locked in, it's time for the contrast. Everybody say hi to our good old friend Curves. :-) Normally I'd go for more of an S-shaped curve, but this one demanded the blacks be opened up a bit.


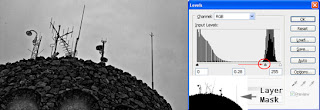
After this, I decided to darken the sky a bit. I did this using the Levels adjustment layer with a mask to affect only the sky. The mask looks complex, but it's easy enough to do. Go to your Channels panel, copy either of the channels (we're in mono mode, so they're all identical), then throw levels onto it to make it almost completely posterized in black and white. Any missing bits you just fill in with a brush. Ctrl/Cmd-click on the channel thumbnail to load it as a selection, go over to the layer mask thumbnail, invert your selection and fill with black. Tadaah!


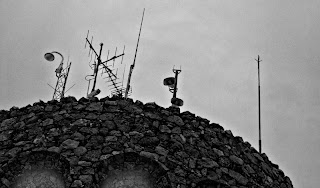
Now, we're nearly there. All that remains is a bit of retouch (some nasty spots showed up after the levels adjustment) and some sharpening and we're pretty much done. Use your favourite retouching tools on a blank layer (remember to check Sample all layers), merge and sharpen using the luminosity sharpening technique. After a few fairly simple steps - three adjustment layers - we have a black and white conversion:


Of course you can take this further if you want to - and I sometimes do - by adding grain or noise, blurring elements, dodging and burning, painting in bits that need to be solid black (aka "cheating", try it; it's great), adding other filters, et cetera. It's all up to you. That's the beauty of this business.

Hope this inspires you; feel free to post links to your black-and-whites in the comments section, whether they are done using some of the tips picked up here or not. And don't forget; have fun!

Monday 26 November 2007

Moody blues

1/160 sec at f/8, -2 EV, ISO 100.
Nikon D200 with 18-200VR at 95mm.
Taken 24 October 2007 in Puerto Bañus, Marbella, Andalucia, Spain.

In the foreground, you see the lighthouse in Puerto Bañus in Marbella, Spain. The chunk of land on the far right is Gibraltar and the larger chunk in the background is, well, Africa. Morocco, to be precise.

Thursday 22 November 2007

The Lightroom double-exposure conundrum

I hinted in my initial Lightroom post that there was a situation where I still used ACR. It's when I need to do the double-exposure merge trick, simply because I don't know how to get this to work within Lightroom; perhaps one of my readers might be able to help out?

In the olden days, before Lightroom, you would open your raw file in ACR, create an exposure that made your ground look OK, but the sky washed out, hit Shift to have the "Open Image" button turn to "Open Object" to open the file as a Smart Object within Photoshop. Once there, you'd right-click the layer thumbnail and select "New Smart Object via copy", double-click the new layer thumbnail to open the new object in ACR, change the settings so that the sky looked OK, save and go back to Photoshop and mask out the ground from the top layer and, hey presto, you'll have a perfectly exposed sky to go with your perfectly exposed ground.

Now, with Lightroom this doesn't quite work. I expose the ground properly in Lightroom, export to Photoshop, select "New Smart Object via copy" and double-click the layer thumbnail... only to have a PSB file opened inside of Photoshop. No ACR action. For this to happen, I need to expose in Lightroom, write the image settings to an XMP sidecar (one keyboard shortcut) and then open the raw file from within Photoshop to force it to use ACR - where I then follow the above steps. It works but it's a bit backwards, it takes a few extra steps.

Anyone got any hints on how to improve this? Is there a way of getting this to work without having to take the extra steps? I imagine one way of at least making it ONE step shorter is to set ACR as the "Additional External Editor" in the Preferences dialogue to make sure it comes directly via ACR into Photoshop as a Smart Object, rather than having to convert it manually - but how do I do this? Ore are there any other suggestions?

Wednesday 21 November 2007

The woman I love - at least part of her*)

1/2000 sec at f/4.8, ISO 200.
Nikon D70 with 18-200VR at 46mm.
Taken 2 June in Platanias, Crete, Greece.

Anna was in what must be called her spiritual home, Greece, for a week off before kicking off her summer job this year. With about a minute of planning, I decided to go down and visit her for a day. Between spending six hours at Athens Airport waiting for the connecting flight to Chania and me getting up to find a taxi in Platanias at 04.30 two mornings later we had a great time, I don't regret doing it one bit.

This was the last trip I took before I got my new camera (I still have the D70 as my "second" camera) and this is one of the better shots I took that day. The view from the old town in Platanias is stunning, although you can't see much of it here. :-)

*) And what I mean by that is that you can only SEE part of her, not that I only LOVE part of her. :-)

Tuesday 20 November 2007

Getting organized with Adobe Photoshop Lightroom

UPDATE 21 Nov: On my way home from work today I was watching episode 108 of PhotoshopUser TV (link below) and I notice that Scott Kelby's quick introduction to Lightroom is almost identical to mine. Just a disclaimer: I had not seen the episode when I wrote this post, so I am not trying to rip Mr. Kelby off. :-)
---

Recently, I decided to follow the general hype of the last year and finally have a look at Adobe Photoshop Lightroom, Adobe's so-called "essential toolbox" for professional photographers. Having done all my importing and backup work as well as sorting and processing manually using the Bridge, Camera Raw and Photoshop together with other applications such as disk synchronisation tools and a pile of blank DVDs, Lightroom would clearly mean a big step towards getting organized.

Let's just start immediately by saying that I am not a professional photographer, I am a happy amateur that simply takes too many photos not to have an organized workflow. I currently have just over 30 GBs of imaging files on my hard drives - this is absolutely unsorted (well, catalogued by date) and a mix of good/bad/finished/unfinished/whatever shots, all "managed" manually. Somewhere, I have a bunch of black and white contact sheet printouts of my first two DVD backups that show a 1 x 1.5 cm thumbnail together with the first 8 characters of the filename (that's all that would fit) - and the filenames are of course the standard ones that come out of the camera - _DSC0234.NEF, et cetera. Add in multiple camera bodies, some of which were set to restart count from 0001 every time a memory card was formatted, as well as some files in both JPEG, NEF and DNG - some even in PSD or TIFF - and the fact that I've had no standard way of using metadata or keywords in the past. Now you're getting close to the chaos I have. Clearly, it's not a working situation, and something needs to be done about it. Enter Adobe Photoshop Lightroom.

Lightroom is divided into basically five different modules; Library, Develop, Slideshow, Print and Web, all designed to speed up the photographer's workflow from import to finished result. Each module has been specifically designed to handle specific sets of tasks, making them incredibly intuitive and well planned. I'll take a look at them individually here, starting with the first one you'll see when you fire up the program.

The Library module is where you work with the actual image files. Here is where you import your photos, where you apply metadata, sort through and get rid of any blatantly bad shots, where you tag your good ones, add ratings, colour labels, keywords... et cetera. You can view all your pictures at once, or you can watch a single folder, all pictures taken on a certain day, with a certain camera, with a certain rating, with certain metadata statistics or pretty much any property that you can assign to an image. Images can be grouped as collections so that you easily can bring up the "keepers" from a specific photoshoot or event with a few clicks. The Grid view is probably where you'll spend most of the time while in the Library module - this is where you see all the images filtered by whichever criteria you choose; the Loupe view let's you zoom in on one individual image (down to 100% or more) and even apply some basic processing; and the Survey view is where you look at a few pictures in one go, deciding which of them is the best (for example, a burst of shots taken of the same pose). You have access to all your metadata here, as well as keywords and a search panel.

The Develop module is essentially the same as Adobe Camera Raw (ACR), with a slightly different interface. Here is where you "develop" your images; adjust white balance and exposure, tweak contrast, vibrance and sharpening, and pretty much everything else you'd do in ACR. Lightroom, like newer versions of ACR, support processing of JPEG and TIFF files as well as a host of raw formats; Lightroom 1.3 (released on the 16th of November) adds support for Canon's flagship EOS 1D MkIII (touted by several magazines simply as "The world's best digital SLR") as well as Nikon's new D3 and D300. The Develop module also includes things like split toning, correction for vignetting and chromatic aberration as well as noise reduction and input sharpening, plus basic tools such as cropping, red eye removal and simple (non-destructive!) healing. Having this module tied directly to the library (one click or key push and you jump back and forth) rather than having it separate (as is the case with Bridge and ACR) saves a lot of time and makes the process a lot more intuitive and accessible, at least for me.

The Slideshow module is all about quickly generating slideshows, either for use within Lightroom directly, or for export to send to your clients. Highly customizable, Lightroom quickly compiles your images into slides, displaying the extra information you want, including your logo and any other information you select. Export the slideshow as a protected PDF to distribute proofs to clients; it's all done in a matter of minutes. Lightroom lets you design a template by dragging sliders and moving text blocks around and then auto-fills the slides with images from your current selection. All this is done automatically, while you work on the interface.

The Print module is probably the one that amazes me the most. I haven't actually printed a lot of my pictures in the past, I generally end up shouting at my printer because the page is not properly centered, parts of the image get cut off, the picture comes out smaller than I thought, the colours are off and there is horrible banding due to clogged ink head nozzles because it was so long since I last printed that my ink has dried out. After this I swear to myself that it'll at least six months before I try this again - and hence I end up with the same problem again. Well, the Print module seems to solve all this. With the small reservation that I haven't actually printed anything yet (ink jet printer still not connected after the move), the module works pretty much exactly as the Slideshow one - you select a template, drag and drop margins, sliders, logos and - boom - Lightroom shows you what your print will look like. Naturally, it's all colour managed, so if you've got colour profiles for your monitor as well as your ink/paper, you're laughing. I've got to get this tried out soon, I'm dying to see my shots come out on paper again.

Finally, the Web module. This is, as I am sure you've guessed by now, all about presenting your images online. Choose from a number of predefined gallery layouts, HTML or Flash based, or design your own. Download templates from the Interweb and add them to Lightroom to personalize your gallery. The same techniques apply here - tweak settings in the menu and watch Lightroom automagically place your images where they're supposed to go and finish up your gallery. Once you're done, simply export everything to a file and upload - or if you're lazy/convenient, let Lightroom do it for you - FTP support is built in.

As said in the introduction, Adobe Photoshop Lightroom specializes in workflow - getting your image from import to finished result. What it is not is an image editing application, in the sense that it does not modify any pixels in your application. You can't use Lightroom for retouching, applying filters, creating panoramas, or do any kind of pixel editing that you do in Photoshop. You do not have access to layers or any of the clever tools we know and love from Photoshop, like selective editing, brushes, pens, gradients; all that kind of stuff you still need to do outside Lightroom. What Lightroom does do, at least for me, is to largely replace the Bridge/ACR combination. There are still cases where I use ACR (more on that in a separate post), but as data from Lightroom is easily made available to ACR, this is absolutely no issue.

Where to go for more information on Lightroom? Well, besides Adobe's site and forum, I have two tips. Check out the thrice-weekly Adobe Photoshop Lightroom Killer Tips blog/podcast with Matt Kloskowski of NAPP / PhotoshopUser TV fame for tips, templates, techniques and tinspiration (I call them the four T's). If you're just getting started with Lightroom, check out Matt's boss at the NAPP, Scott Kelby. He's written a book, aptly named The Lightroom Book for Digital Photographers which goes through all the modules in detail, explaining all the quirks and possibilities, and then end up with two chapters explaining his workflow with two different shoots. Very accessible, as always, and a brilliant way of explaining how the application works.

I've got to go now - I have a couple of thousand photos I need to import and get organized. As clever and automated as Lightroom is, there are still some steps that need to be done manually... ;-)

Monday 19 November 2007

Black and white conversion - with a twist

1/25 sec at f/4.8, ISO 400.
Nikon D200 with 18-200VR at 50mm.
Taken 24 October 2007 outside Ojen, Andalucia, Spain

Black and white conversion done in Lightroom, colourized (using solid colour layers in overlay mode) in Photoshop, using quite possibly the most intricate layer mask I've ever done. My eyes are sore now.

Sunday 18 November 2007

With an ocean view

1/250 sec at f/3.8, ISO 100.
Nikon D200 with 18-200VR at 24mm.
Taken 23 October 2007 in Fuengirola, Andalucia, Spain.

Literally across the street from the restaurant where I had the gambas in the previous shot, these apartment blocks tower over the beach and the Mediterranean.

Saturday 17 November 2007

Continuing the orange/red theme...

1/50 sec at f/5.6, ISO 100.
Nikon D200 with 18-200VR at 32mm.
Taken 23 October 2007 in Fuengirola, Andalucia, Spain.

One of the delicious lunches I had during our short holiday on the Costa del Sol earlier this year, gambas in a garlic oil with lots of parsley. Yummy.

Using steps 1, 2, 4, 5 and 7 from Scott Kelby's 7-point system for this one. What do you say? Did it come out too saturated or is it still OK? Not 100% sure.

Friday 16 November 2007

Sunset, Mijas Costa

30 sec at f/16, ISO 100.
Nikon D200 with 18-200VR at 112mm.
Taken 23 October 2007 in Mijas Costa, Andalucia, Spain.